
When working on a car’s electrical system, you may come across chafed cables that barely isolate the copper from other cables, components, or the chassis. Also, sometimes when investigating a tricky electrical issue, it might be handy to cut a cable in order to make sure that the cable and its attached component is no longer in the loop. Such cables have to be repaired. This has to be done in a manner that will be at least as good as the original connection, but preferably better than that.
The idea of making a new connection between two leads is to connect them:
- in a mechanical solid way – if you pull hard, the connection should stick
- in an electrically conductive way – the new joint should not lead to any new electrical resistance
- in a waterproof way – no water may be able to reach the copper strands
Only the combination of all three conditions leads to a proper connection.
Manners to connect two cables:
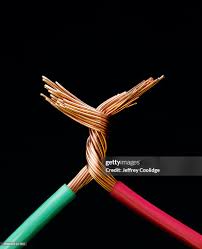
- Twining and tape:
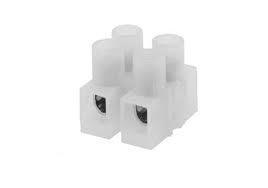
- Crownstone:
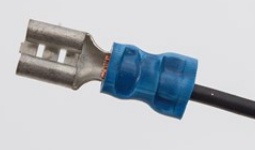
- Cable shoes:
- Solder and tape:
- Y-connector:

- Crimp and heat-shrink:
- Solder and heat-shrink
- Auto-solder heat-shrink
Red: this is a no-no
Orange: may be ok, if executed to perfection
Green: this is the way to go!
Any method excluding heat-shrink (see the red items in the list above) is considered bad and will sooner or later lead to new problems. I will not discuss these here. Instead, we go straight for the proper methods that include heat-shrink.
Solder is preferred over crimping. Crimping is allowed only if heat-shrunk.
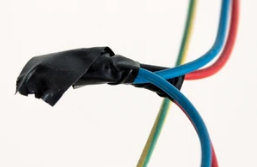
How to properly connect two electrical wires:
- First, strip the copper until you get clean copper. As long as any green copper oxide shows, keep cutting.
- Secondly, remove the isolation for about 10 to 15 millimeters.
- Important: put a suitable length of heat-shrink over one of the leads! (No, you’re not the first to forget that, not will you be the last.)
- Now you either:
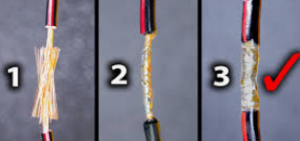
- Twine the copper bits together so nothing sticks out
Or: - Push both ends into each other while pushing back strands that stick out
The result should be like a straight piece of wire that is missing its insulation.
- Twine the copper bits together so nothing sticks out
- Solder the copper parts together.
- Let it cool off.
- Slide the heat-shrink over the soldered joint.
- Shrink the heat-shrink.
- Ready!
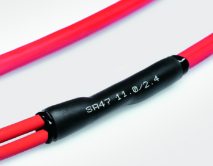
This should look something like this:
If the lead was part of a harness that was covered by a protective cover, and/or taped, repair even that as original. Then make sure the harness cannot move so much that it will grind against anything. Use cable ties to keep it in place.
…
Paul
2025-09
Sweden
This page is part of a series. You can find the main page for the series here.