
Most of the electrical cables and wiring in any car’s electrical system are made of copper. Copper is a great choice for that, as it has a very low electrical resistance, and the thin strands are flexible without breaking too soon when flexed. It used to be a very cheap material, which contributed greatly to its popularity for electrical wiring – but I’m unsure if that’s still the case today.
Another ‘feature’ of copper as a material is corrosion – it corrodes easily. In doing so, the copper chemically changes to copper oxide, which has different properties that are not favorable for its use as an electrical conductor. You can read more about that here.
You might argue that corrosion of copper wiring doesn’t matter, as all wires are isolated and not exposed to the weather. This is partly true; all relevant wiring is always isolated for that purpose. But in climates with wet or regular freezing conditions, moist – or worse – salty moist has a tendency to find those spots that are not sufficiently or not at all isolated.
The design:
In those colder or wetter climates, any wiring that leaves the copper strands exposed will eventually corrode. The car electric branch anticipated this and designed isolation materials and connector systems to keep the water away from the copper and out of connectors under any circumstances – or so they say. In reality, copper oxide is a real thing that can happen to wiring harnesses of any car brand and will break that car.
An automotive wiring harness is built of groups of electrical cables tied together and surrounded by a cover that aims to keep water away from whatever that particular part of the wiring is exposed to. On the inside of a car, a lighter protection will do the job just fine, as no moisture is expected there. Outside the car, in the engine bay, around the transmission, or to the rear of a pickup truck, different circumstances are to be expected. Here, the materials surrounding the harness are the only protection against water, salt water, and mechanical contact.

If you have a look at the different harnesses in different parts of the car, you’ll immediately notice the differences in isolation and protection. The lighter protection against the elements inside a car might do a fine job when the car is new. But given a life and use for a number of years, the risks of water intrusion into the car increase, and with that the risk of water coming in contact with the wiring loom with corrosion as a result.
In the more exposed places mentioned above, better countermeasures are designed. But even these can be under constant attack from the elements during the service life of the vehicle. Water collects in places not sufficiently protected and finds its way into the wiring harness. Electrical cables with isolation not designed to work underwater will eventually fail. And with that, the copper is exposed.
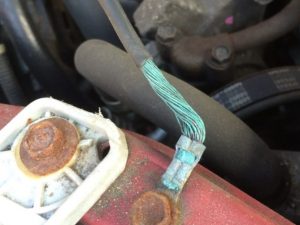
Green crusties:
When copper corrodes, the resulting material, called copper oxide, gets a green color. Also, the conductive properties of copper oxide are far worse than for copper. The copper oxide forms a built-in resistor in the wiring harness. Or in the best case, it will result in a total break in the conductive material, called an open circuit.
‘Best case’? you may ask. Yes, in the art of diagnosing anything, it is often better to have a total malfunction than a semi-malfunction. It’s simply easier to diagnose. The copper oxide that causes failure in automotive electrical systems is referred to as Green Crusties.
Volt versus Volt:
Let me demonstrate that with an example. Say you have an electrical lead that’s going to one of the rear lights. The lead is part of a wiring loom that goes through the boot of the car. Now, imagine our lead is perforated somewhere by a screw holding an aftermarket accessory that was carelessly installed. The screw has pierced the wire, but not cut it. As a result, everything works fine. Over time, the rubber of the windows and the bootlid dries out with some water leakage as a result. Or the car has had a slight fender bender, and a seal between body panels is not properly replaced. Or the bodywork rusts under the car or in a wheel well, and water is thrown in by the wheel. Or the owner does some rust prevention and seals up the places where water is supposed to drain out. Or…well, you get the drift.
This rainwater now drips where it was never supposed to be and finds its way to the electrical wire pierced by the screw. With direct access to the copper, the water and warmth get oxidation started, and copper oxide is formed. The light still works, but it might be less bright.
Customer complaint:
The customer brings in the car, stating he has replaced the bulbs, measured the battery, and charging system. All’s well and still the lights are not a bright as they were. Can you fix the problem?
To tackle the problem, you remove the lightbulb for inspection – it is ok. Then you take out your multimeter to check if the volts are ok at the lamp fitting – this is also ok. Using your analytic skills, you deduce that it must be the earth or minus lead that is at fault. But if you bridge the minus connection on the lamp fitting to a known good minus in the boot of the car, the lamp still does not burn bright – so it isn’t the minus either. Now what?
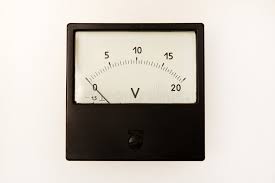
Now, had you measured the voltage directly on the bulb with the bulb installed and the lights on, you’d have seen a lower voltage than the battery voltage there. This would show that there’s a bad connection in the circuit somewhere between the fuse box and the bulb. That would have told you there’s a resistance somewhere in that circuit. You’d not have solved the problem, but you’d have had a big clue as to how to proceed and where to look next.
‘Now why was the voltage on the fitting less than the battery voltage?’ you may ask. The reason for this is the bad patch of cable. The corroded part of the cable acts as a resistor, and you therefore have two resistors in series in the circuit: the corroded bit of cable is one, and the lightbulb is the other. With the current to the bulb first going through the corroded cable, part of the voltage is lost here – remember Ohm’s law?
‘But why did I first measure the correct battery voltage at the fitting?’ you may ask. Simple, as the bulb was not installed, there was no current flowing in the cable, and according to Ohm’s law therefore no voltage was ‘lost’.
Test lights:
Most mechanics will use a test light to check if there’s a voltage or not. However, the choice of test light is quite important for the result of the measurement. If a cheap test probe with a LED light is used, almost every measurement will give a good result. The reason for this is that a cheap LED test light will probably light up for any voltage between 4 and 20 volts. As such, the voltage drop caused by green crusties will have no effect on the LED lighting up. This will mislead you into believing all’s well where it is not, had we used the better tool.
A better choice would be a test light that draws about the amperes the original circuit would draw. In the case of checking the circuit for a rear position light, a 10W lamp would be a better choice. Using such a test light, we would have seen immediately that the test light did not light up very bright and come to another conclusion than we did first.
Test light conclusions:
- A LED test light will only draw a very small current and work at a wide voltage range. It will not expose resistance built up in corroded wires or connectors. Don’t use LED test lights for diagnostic purposes!
- A test light pulling a current in par with the current normally pulled by that circuit will show there’s something wrong.
- For the best result, you may need a set of test lights varying from 5W to 55W.
Paul
Sweden
2025-08
This page is part of a series. You can find the main page for the series here.
#diagnosis #cardiagnosis #car-diagnosis #odb2 #odb-II #faultcode #ecm #bcm #testlight #greencrusties