
If turning the key to start the engine or pressing the button to do that has no effect – you cannot hear any of the usual sounds to indicate that your starter motor is cranking the engine, then you have what is generally referred to as ‘a no-crank’.
The simplest thing to test now is connecting starter-cables, or a battery pack and try again. If the starter motor now makes its usual noise and starts the engine; you got an empty battery. The question to ask yourself now is why that battery is flat. Is the battery dead? Is the engine charging the battery? Is there a battery drain? These a rethings for another page, here and now, we’ll focus on the starting circuit.
So if the car still is a no-crank with the battery pack or starter cables connected, then we have to look further at the starter circuit.
A no crank implies that the starter motor does not engage when attempting to start the engine. While the components involved in starting the engine have become more and more complicated, the startmotor itself remains basically the same as it was before cars went electronic. And as such, it is fairly easy to test.
Obviously, an empty battery will not crank a car, so we’re starting with a battery test. Next we apply a charger with start mode. If turning the key or pressing the button does not start the engine, we’ve got the customer’s complaimt confirmed.
The starter motor:
Here’s an example of a typical starter motor:
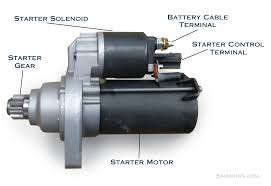
…and its connections. Note that one vital important connection is not mentioned in this picture: the minus connection. It usually consists of the housing of the starter motor. When installed, it will connect to the engine, which in its turn is connected to the chassis, which in its turn is connected to the battery minus.
Fun fact:
In the early days of motoring, the English car industry found certain advantages to having the battery plus connected to the chassis and the battery minus connected to the electrical installation. This practice ended in the 60-ies of last century.
The starter circuit:
The most basic starter circuit has quite a few components:
- A thick plus cable directly from the battery
- A signal lead that activates the starter solenoid
- A ground or minus, which is usually the housing
- The minus lead from the engine to the battery
- Electronics (modules and sensors) that decide if the starter motor can engage
Does the starter motor itself work?
If we ignore the last one for now, we can easily test all other components by activating the starter solenoid. This selenoid basically is an oversized relay. If we hook that up with a fused plus lead directly to the battery, then the solenoid should engage, and the starter motor should start turning the engine. It should not only turn, but the starter shoudl also engage with the engine. If that works and the engine cranks, we’ve tested the plus and minus circuits, the solenoid, and the starter motor. As such, there’s only one thing missing, and that is the signal to start.
Mind you, while running the starter motor, perhaps you noticed it was spinning very slowly. Or you noticed that the engine did not spin in a regular fashion, slow at some points, faster in others. All of this is good to notice, as it may point to other issues that are not directly related to the starter circuit, but we may have use for them later.
Back to the diagnosis.
Another possibility is that the starter motor is only producing a click. In such cases, banging the motor with a hammer while activating it may make the starter motor crank. As we all know what causes that, we will not waste our time on this today.
The same goes for the starter motor spinning quickly, but not engaging the engine. That’s mechanical and an easy fix – again, we’ll move on.
If the starter motor now spins nicely and engages the engine when activated, we know the starter motor itself is okay, including the solenoid, and that the plus and minus leads are ok. So the no crank has nothing to do with these parts. So the missing bit is the signal that tells the starter motor to engage.
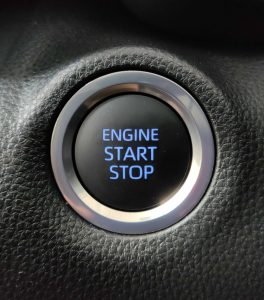
In its simplest form, this signal comes directly from the ignition lock. You stick the key in, turn the ignition on, and then turn the key further to the ‘start’ position to get the cranking going. The wire to start the cranking came directly from the lock and went straight to the solenoid. Alternatively, the start signal would activate a relay that would send the starter signal to the selenoid. Modern cars may still have such a lock, but more often have a start button instead. But in most cases, there’s still a relay to activate the selenoid. These days, no wire goes directly from the ignotion key to the solenoid anymore.
The ignition lock or button first performs a security check. It verifies that the key used to switch on the ignition, prior to starting the car, is indeed a valid key and known to the car. If the key is not known to the car, the security light in the instrument cluster will light up, and the car will not crank. If the car recognizes the key, it will turn off the security light and should allow cranking. Recognizing the key is vital for the car to crank and start. Unknown keys often make a car a no-crank/no-start. Notably, on some brands, the car will start and run for a second before dying as a result of an unknown car key.
Not turning off the security light points towards an unknown key or something fishy in the security system. This can be the key, the antenna for the key signal, the wiring to the security module, or the wiring from the security module to the ECU. For now, let’s assume the light went out.
So our car recognized the key, but did not start the engine anyway. The next items in the series of checks are the gear selector switch, the brake pedal switch, and/or the clutch pedal switch. Each of these must be in the correct mode for the car to crank. While these checks differ from brand to brand and from car to car, usually, you have to press the brake pedal to allow the car to be started. For manual gearboxes, also press the clutch pedal to be sure. If the car’s an automatic, playing around with the gear selector to see if it cranks is good practice. The position of the switch in the gear selector sometimes shifts slightly due to wear and is no longer in the exact correct position to indicate Park or Neutral, which is a prerequisite for cranking the engine. If any of these result in the car suddenly cranking, you’ve found your problem.
If everything is fine so far, but it’s still a no-crank, this would probably be a good time to dust off your scan tool and check the car for fault codes. With some luck, there’s a code that will point the diagnosis in the correct direction.
With no codes, it’s about time to pull out the wiring diagram and our trusty test light. Using these, we’d need to see how the start circuit from the ECM is wired, what relays are involved, if they are activated, and if the start signal from the ECU is indeed there. There can be one or more relays involved in starting the ECM and providing the crank signal.
The way a starter system works is usually:
The car first checks whether the key is valid. If so, the car checks if the switches for the gear selector, the brake pedal, and the clutch pedal provide the expected signal. Then the ECM checks the sensors to see if there’s a value incompatible with start. If that’s okay, then the ECM sends a starter signal to the starter relay. The starter relay engages and sends a signal to the starter motor selenoid. The relay engages, and the car cranks.
Still a no-crank, we’ll check the wiring diagram for the starter relay and its fuse. The fuse should be okay, and the relay should click when the starter signal is sent. No click means no-crank. Time to get the test light out.
What’s a relay:
A relay has four, five, or more pins. This is depending if the relay can switch on and off, and if it can switch more than one channel. In most cases, a four-pin relay is used to switch something on – in our case, the starter motor. Here are the basics:
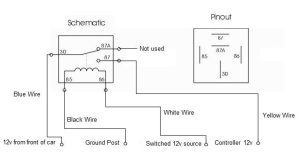
For a relay to activate, it needs a plus and a minus on pins 85 nd 86. These will activate the electromagnet that pulls the switch that now connects pins 30 and 87. If one of the pins was connected to battery plus, then the relay will now provide battery plus to the other side of the switch. That activated side goes to the selenoid that now engages – the engine cranks.
As we still had a no-crank, we now need to verify the connections to the relay, and the relay itself.
Plus side switching and ground side switching:
A relay is activated by the plus and minus on connections 85 and 86. Switching on a relay can be done in two ways:
- Constant battery plus and switched ground
- Constant ground and switched battery plus
Within modern car electrical installations, we usually have ground-switched relays. This means that we usually have two battery plus connections on the relay, albeit one that may bo hot only when the ignotion is on. Additionally, we have one lead to whatever we’re switching (our selenoid), and another going to a module that pulls it to ground to activate the relay.
The relay connections:
So we should find two of the relay connections having a battery plus. Taking out the test light is the easiest way to check this. Then we have one lead going to the ECM that will pull it to ground, and another going to the selenoid.
Now connect your test light between connections 85 and 86. When starting, we should have a solid ground on the ECM lead – the test light lights up. If not, the ECM does not pull to ground; there’s your problem!
If the above was okay, then we will shortly activate the selenoid by connecting pins 30 and 87 with a suitable test lead. If it now cranks, that part of the electrical circuit is also okay – now remains the relay. If it didn’t crank, then we have a problem between the relay and the solenoid. There’s either a bad connection or an open circuit.
Testing the relay:
We can easily test the two functions of a relay:
- The electromagnet:
Connect pins 85 and 86 of the relay with some test leads to the battery plus and minus:- Click: Okay!
- No click: Bad relay!
- The switch:
Put an ohm meter on the switched pins 30 and 87, then activate the relay as above:- Near zero ohm: Okay!
- Any value higher than a few ohms: Bad switch in relay!
If we’re lucky, we solved the problem and went from a no-crank to a good starting and running engine. But if the car now cranks fine but the engine will not start, we went from a no-crank to a crank no-start!
Paul
Sweden
2025-09
This page is part of a series. You can find the main page for the series here.